Why Your Tire Keeps Going Flat
Dealing with a flat bike tire has evolved with all the conflicting advice flying around. Patch it, inflate it, ride three days — flat again. Or you’re five miles out and limping home on the rim wondering what went wrong this time.
As someone who spent an entire summer chasing phantom leaks, I put in the hours studying this particular brand of misery. Today, I will share it all with you.
Here’s the first thing to nail down: does your tire go flat during a ride, or does it slowly deflate while the bike just sits in your garage?
Sudden flats mid-ride usually mean a puncture, a pinch flat from low pressure, or bead damage. Slow overnight leaks point somewhere else entirely — valve trouble, failed rim tape, a tiny puncture you haven’t found yet. That distinction matters. A lot. It determines where you even start looking.
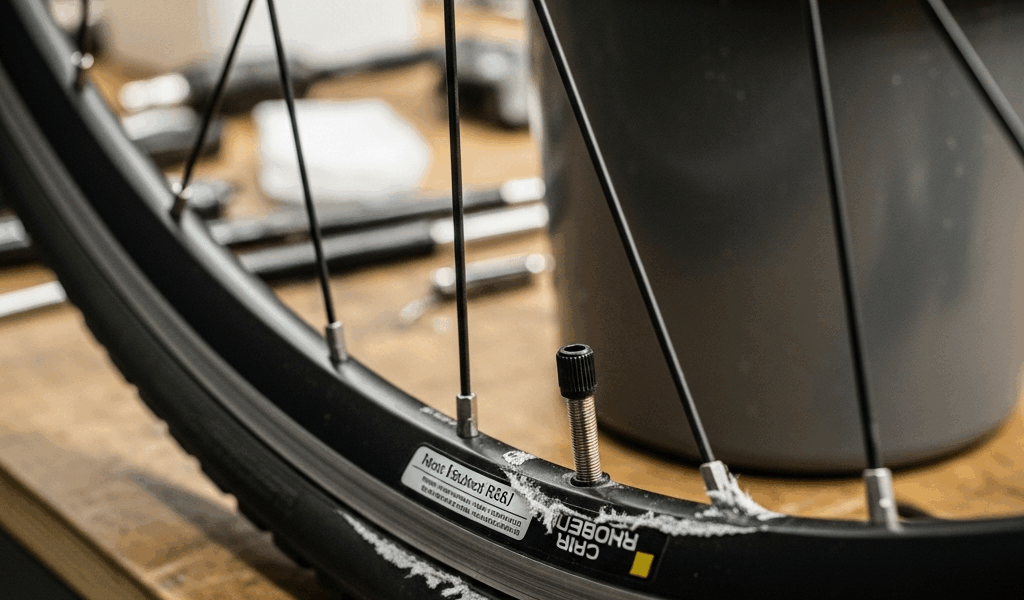
Check the Tire First Before Blaming the Tube
Most people go straight for the tube. Worth saying out loud — I wasted somewhere around $40 on replacement tubes before I figured out that was the wrong move entirely.
Take the wheel off. Remove the tire completely. Don’t just squeeze it and squint hopefully. Actually pull it off the rim.
Run your fingers slowly — and I mean slowly — around the inside of the tire casing. Feel for glass shards, thorns, wire fragments, anything sharp. This is the single most skipped step in the whole process, and it’s exactly why people get repeat flats in the exact same location. Whatever punctured the tube is still sitting there, embedded in the rubber, patiently waiting for the next one. I’m apparently sensitive to this kind of thing and find debris by touch while my riding buddy never catches it visually — avoid the path I took of trusting your eyes alone here.
Find something? Pull it out with tweezers. Mark that spot on the outside of the tire with a Sharpie so you can check the tread for damage later.
While the tire is off, run through these:
- Sidewall cuts — Gashes or tears running vertically along the tire wall don’t always blow immediately, but they weaken the structure and set you up for pinch flats down the road — at least if you’re riding anything beyond flat pavement.
- Tread wear — If you can see casing threads or the tread is nearly smooth, that tire is a pinch flat waiting for the right pothole. Thin rubber simply can’t absorb impact the way it needs to.
- Bead damage — The bead is the reinforced edge that locks into the rim. Run your fingers along it and look for cracks, separated strands, or anything that looks compressed or misshapen. A damaged bead won’t seat cleanly, which leaves gaps where the tube gets pinched.
Rode through a pothole last spring — looked completely minor, no visible puncture anywhere on the tread. That bead was quietly wrecked, though, and every tube I installed deflated within two days. Swapped the tire and the problem disappeared immediately. That was a $45 lesson.
Inspect the Rim Tape and Rim Edges
Rim tape is your unsung hero. But what is rim tape? In essence, it’s a narrow strip of material covering the spoke holes so your tube doesn’t slowly poke through them and deflate. But it’s much more than that — it’s often the difference between a wheel that holds air and one that baffles you for weeks.
Pull the tire and look at the tape. Is it centered? Does it cover every spoke hole completely? Any tearing, cracking, or peeling at the edges?
Misaligned or damaged tape is your leak — and these failures tend to cluster around the valve area or near specific spoke nipples. It’s localized, not random. Replace the tape with a width that actually matches your rim — I learned this painfully with a 19mm rim and 17mm tape that never quite sealed right no matter how carefully I applied it. That’s what makes rim tape width feel like a weirdly specific detail until it absolutely ruins your ride.
Also drag your hand around the inner rim edges. Some rims — cheaper alloy ones especially — have sharp burrs or rough spots that slowly wear through a tube as the wheel flexes and the rubber shifts slightly with each pedal stroke. Feel a snag? A few passes with 220-grit sandpaper smooths it right out. You don’t need much — just enough that your fingertip glides without catching.
Valve Problems That Cause Slow Air Loss
Tire looks intact. Inspection found nothing. Still losing air overnight. The valve might be the best option to investigate next, as slow air loss requires ruling out the obvious before chasing obscure causes. That is because valve failures are invisible — you won’t see them during a casual inspection.
Presta valves have a small locknut at the tip that unscrews for inflation. Hand-tighten that locknut. A loose one bleeds air constantly and gives you absolutely no visible sign it’s doing so.
Schrader valves — the kind that look like car tire valves — have a valve core that can wear out and leak slowly. Test it by dabbing soapy water on the valve while the tire is inflated. Bubbles mean the core is the problem. A valve core tool costs about $3 at any bike shop and lets you swap the core without touching the tube. Much cheaper than a whole new tube.
There’s one more culprit nobody talks about: the pump chuck itself. A worn or cracked chuck won’t seal cleanly at the valve, and in some cases it’ll actually damage the valve core a little each time you inflate. I’m apparently hard on pump equipment — spent two weeks replacing tubes and suspecting my rim tape before realizing my Topeak pump chuck was warped. Fixed the chuck, never had that problem again. Learn from what tripped me up.
How to Confirm You Fixed the Problem
Inflate to the pressure printed on your tire sidewall — typically 80–100 PSI for a road tire, 30–50 PSI for a mountain bike tire. Something like a Schwalbe Marathon or Continental GP5000 will have it stamped clearly on the sidewall bead area.
If you have a bathtub handy, submerge the wheel section by section and watch for bubbles. That’s the most reliable method. No tub? Mix a small squirt of dish soap into a cup of water and brush it generously over the valve stem, the entire bead where tire meets rim, and anywhere suspicious on the casing. Bubbles will form wherever air is escaping — even slowly.
Now leave it alone for 24 hours. Check the pressure. Held steady? You got it. Lost more than 5 PSI? Something is still hiding — so, without further ado, go back through the checklist from the top.
One last thing: multiple patches, visible sidewall separation, layers peeling apart — that tire is done. Repairs buy time, not permanence. A solid replacement road tire runs $30–60. Mountain bike tires, $40–80. Cheaper than a third patch kit and cheaper still than the misery of getting stranded two miles from anywhere on a Tuesday evening.


Stay in the loop
Get the latest safe cycling zone updates delivered to your inbox.