The 30-Second Diagnosis — Find Your Cause Fast
Bike drivetrain problems have gotten complicated with all the conflicting advice flying around. Forums say replace everything. YouTube says it’s probably nothing. Meanwhile, you’re out on a climb and your chain is skipping so bad your knee nearly goes through the top tube. I’ve been there — way more times than I should admit, mostly because I kept ignoring the early signs.
Here’s what actually separates a quick fix from a $400 shop visit: knowing which component is failing before you throw money at the problem. Most cycling blogs dump every possible cause on you without helping you find yours. Today, I’ll share everything I know about diagnosing this fast.
The Chain Checker Test — 30 Seconds
Grab a chain checker tool. Park Tool makes the CC-3.2 — runs about $12, maybe $13 at your local shop. Slide it onto your chain at three different spots: once near the cassette, once mid-run, once near the front chainring. If the tool drops fully in, your chain has stretched past 0.75%, and there’s no way around it — replacement is mandatory. That one test answers the biggest question faster than anything else.
No tool? Measure manually. Count exactly 24 links (pin center to pin center). A brand new chain hits 12 inches exactly. If yours measures 12 and 1/16 inches or longer, it’s done.
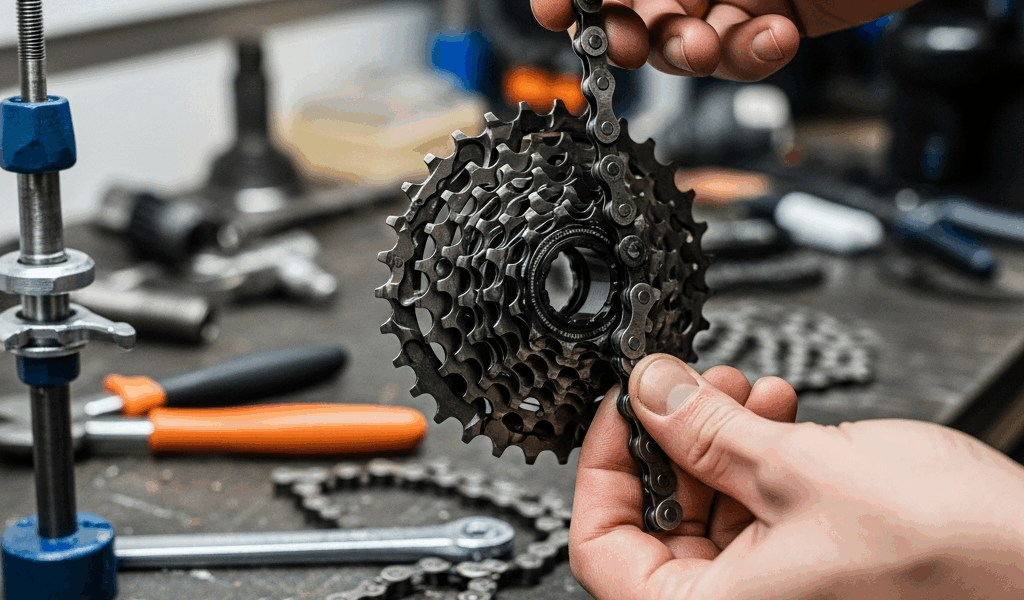
The Visual Cassette Inspection — 30 Seconds
Spin the rear wheel slowly. Watch the cassette teeth from the side. Worn teeth look like shark fins — hooked and sharpened on the trailing edge. Fresh teeth are blunt and symmetrical. Hooked teeth mean the cassette is cooked.
Probably should have opened with this section, honestly. I replaced my chain three separate times before a friend finally pointed at my cassette teeth and said “look at those hooks.” That ignorance cost me around $150 in perfectly good chains that wore out almost immediately. Don’t make my mistake.
The Cable Tension Pull Test — 20 Seconds
Shift to the smallest cog. Pull the rear derailleur shift cable by hand. It should feel like pulling a tight shoelace — firm but not wrenching. Loose and floppy means tension is too low. Stiff and resistant means it’s too tight.
Then shift to the biggest cog. Smooth movement, no hesitation. Anything sticky or grinding suggests cable friction or a routing problem somewhere along the line.
The Derailleur Hanger Alignment Check — 30 Seconds
Stand directly behind the bike. Look at the derailleur cage. It should sit perfectly parallel to the cassette — one clean vertical plane. If it angles inward or outward at all, the hanger is bent. This is almost invisible in photos, but under load it destroys shifting.
Crashed lately? Dropped the bike on the right side even gently? The hanger bends before the derailleur breaks — that’s literally the design intent. Hangers run $20–$60. Derailleurs run $200 and up. Take the cheap loss every time.
Worn Chain and Cassette — The Most Common Cause
Chain skipping under load usually points here first. The chain stretches gradually through normal wear, the cassette teeth hook over time, and at some point they just stop meshing cleanly when you actually push power through them.
Understanding Chain Wear
Here’s something worth knowing: chains don’t actually stretch the metal. The pins and rollers wear down, creating extra play between rivets, which makes the overall chain longer. A chain at 0.5% wear still runs fine on a fresh cassette. At 1.0% wear, it’ll skip on anything with real mileage on it.
Wear is cumulative. Every single ride adds a tiny bit more. You can’t undo it. Once the chain checker drops in, you’re buying a new chain — that’s it. A new chain runs $25–$65 depending on what groupset you’re running. Shimano 105 chains are around $30. SRAM Rival is closer to $45. Ultegra and higher pushes past $50.
Timing matters more than most people realize. Replace the chain before the cassette wears out. A worn chain on a fresh cassette chews through that cassette surprisingly fast. A worn chain on a worn cassette will destroy both in one or two hard rides.
Cassette Wear and Replacement
Cassettes don’t wear evenly. The smallest cogs take the most load and go first. Once three or four of those smaller cogs look hooked, replace the entire cassette — not individual sprockets. Individual sprocket replacement almost never works cleanly anyway.
Pricing jumps significantly by groupset. Basic 8-speed cassettes are $20–$40. Shimano 105 11-speed sits around $60–$80. Ultegra 11-speed runs $120–$150. SRAM Rival 12-speed lands at $90–$110. High-end stuff can hit $250 without blinking.
Replace Chain, Cassette, or Both?
Depends where you are in the wear cycle. Chain worn past 0.75% but cassette teeth still look symmetrical and blunt? Replace just the chain. Cassette looks hooked but chain is under 0.5%? Replace just the cassette — though honestly, this situation is rare.
Most of the time you’re replacing both. That’s what makes component wear frustrating to us cyclists who just want to ride — nothing fails in isolation. I put a fresh $35 chain on my gravel bike last spring and skipped replacing the cassette to save $80. That chain was useless within a week. The cassette hooks just ate it alive.
Replace both and move on. Total cost lands somewhere between $85 and $230 depending on groupset. A shop charges $200–$400 in labor alone. DIY takes about 45 minutes once you own a chain breaker tool — the Park Tool CT-3.2 runs about $15 and lasts forever.
Cable Tension and Derailleur Indexing Fix
Chain and cassette look fine? Cable tension might be the actual problem. The rear derailleur needs precise cable tension to land the chain on each cog correctly. Too much tension pulls the derailleur too far inboard — chain rubs, skips on larger cogs. Too little tension and the chain won’t climb to the small cogs cleanly under power.
The Barrel Adjuster Technique
The barrel adjuster is your main precision tool here. On Shimano systems it’s usually where the shift cable enters the derailleur body. On SRAM, it’s often on the shifter itself. Loosen the lock bolt — usually M5 or M6 — before adjusting.
Shift to the smallest cog. Chain should climb on without hesitation. If it stumbles or jumps, turn the barrel adjuster counterclockwise in half-turn increments. That decreases tension, letting the derailleur pull more aggressively inboard. Then shift through the full range — 1, 2, 3, all the way to the big cog. Smooth and quiet the whole way. Grinding on the two largest cogs means turn the barrel adjuster clockwise, half a turn at a time, to bring tension back up.
So, without further ado — this is honestly where most skipping problems end. I once bought a replacement cassette in frustration when about 90 seconds of barrel adjuster rotation would have fixed everything. I’m apparently quicker to spend money than to troubleshoot methodically, and that Park Tool CC-3.2 works for me now while blind guessing never does. That original cassette still runs fine today.
When Cable Replacement Becomes Necessary
Barrel adjuster adjustments not helping? The cable itself might be the problem. Frayed inner cables or kinked housing create friction that prevents the derailleur from responding to tension changes at all. Replace the shift cable and housing together — around $15–$25 in parts, sold at any bike shop.
Watch the routing carefully. The cable should run the smoothest possible path without sharp bends anywhere. Kinked housing at the bottom bracket area is a common missed culprit. Fraying where the cable exits the shifter body means it’s overdue.
Bent Derailleur Hanger — The Hidden Culprit
A bent derailleur hanger looks completely normal during a quick visual check. You won’t notice anything until you’re hammering uphill or sprinting out of a corner — then the chain skips across two or three cogs at once. That’s the derailleur cage sitting out of parallel with the cassette, and under real load the chain alignment just collapses.
How to Check Alignment
Park Tool makes a derailleur alignment gauge — the DAG-2.2, around $30. Mount it against the inner cage plate of the derailleur. It shows you exactly how much the hanger is bent inward or outward. Anything over 2mm typically causes shifting failures under load.
No gauge? Stand directly behind the bike and sight down the cassette. The derailleur cage should form one clean vertical plane with the cassette cogs. Any left or right angle means the hanger is bent — at least enough to cause problems.
Common Damage Patterns
Hangers bend in pretty predictable ways. Dropping the bike on the right side bends the hanger backward and inward — by far the most common failure pattern. Hitting a deep pothole hard bends it forward. Crashing into a curb or obstacle bends it sideways. Each causes a slightly different shifting symptom, but all of them cause skipping under load.
Crashed recently? The hanger is almost certainly bent, even if shifting felt okay immediately afterward. The stress only shows itself when you actually load the drivetrain.
Replacement and Cost
Derailleur hangers are frame-specific — your bike takes exactly one hanger design, and you need the right one. Replacement costs $20–$60 depending on frame brand. Trek charges around $35. Specialized is similar. Higher-end frame brands charge more, naturally.
Installation is genuinely a 10-minute job. Remove the derailleur, pull the old hanger (two or three bolts depending on frame), install the new one, reinstall the derailleur. A 4mm or 5mm hex key is all you need. That was the whole job.
Some shops offer hanger straightening for $15–$25. That works fine temporarily if the bend is minor. For anything more significant, just replace it — the $35 is worth the peace of mind on a climb.
When to Take It to the Shop
Some drivetrain problems are genuinely outside DIY territory. Knowing the line saves you from making expensive mistakes.
Internal Hub Issues
Bike with an internal gear hub — Shimano Nexus, SRAM i-Motion, Rohloff — chain skipping means hub disassembly. This needs a trained mechanic who knows that specific hub model. Expect $100–$300 in labor plus whatever internal parts need replacing. Don’t open an internal hub yourself unless you’ve specifically trained on that exact model. Seriously.
Electronic Shifting Problems
Shimano Di2, SRAM eTap, Campagnolo EPS — if the derailleur isn’t responding to shift commands, the problem is likely sensor alignment, firmware, or motor function. All of that is shop-only diagnosis territory. Budget $100–$200 for diagnostic and repair work.
Bent Derailleur Body
If the derailleur cage or main arm is bent — not just the hanger — replacement is the only real answer. A new rear derailleur runs $150–$400 depending on groupset level. Professional installation is worth it here. This is outside my personal DIY comfort zone, and I’ll just say that plainly.
Complete Drivetrain Rebuild
Chain, cassette, cables, and derailleur all worn or damaged at the same time? A complete drivetrain rebuild sometimes makes more sense than replacing pieces one by one. A shop handles this more efficiently than piecemeal DIY. Expect $400–$800 in parts and labor depending on which groupset you choose.
The bottom line: diagnose ruthlessly, fix what you can, and know exactly when to call a professional. That 30-second diagnosis up front saves hours of frustration and a lot of money spent on parts you didn’t actually need. Your chain will thank you — and so will your knees.


Stay in the loop
Get the latest safe cycling zone updates delivered to your inbox.