Why Your Chain Keeps Dropping in the First Place
Chain drop has changed quite a bit thanks to the conflicting advice flying around. But strip it down and there are really only three reasons it happens — and knowing which one applies to your specific setup saves you hours of pointless tinkering.
First: misaligned limit screws on your derailleur. These tiny screws govern how far left or right the chain travels. A quarter-turn off is genuinely all it takes to throw everything sideways. Second: wear. Stretched chains and shark-fin chainring teeth lose their grip and bail under load. Third: mechanical damage — a bent derailleur hanger, loose bolts, or a rear wheel that’s migrated in the dropout.
Probably should have learned this before my 40-mile gravel ride in 2019. My vintage single-speed started dropping its chain every 10 minutes, somewhere around mile 12. Turns out it was two problems running simultaneously: chainring teeth worn into actual shark-fin shapes, and a chain I’d over-tensioned by about half an inch. I could have diagnosed the whole thing in ten minutes. Didn’t. Side-step the error I made.
The good news: none of this requires a new bike. Most fixes take 15 minutes and cost nothing.
How to Tell Which Problem You Actually Have
Before touching anything, answer these questions honestly:
- Where does the chain fall? Inside (toward the frame) or outside (away from it)? Inside drops usually mean the low limit screw needs adjustment. Outside drops point to the high limit or a worn chainring.
- When does it happen? Only during hard pedaling? During shifts specifically? Or seemingly at random? Hard-pedaling drops suggest chain wear. Shift-related drops mean derailleur tuning. Random drops — loose wheel or bent hanger, almost every time.
- Does the chain look kinked or stretched? Lay it flat. If links don’t sit flush, or the chain sags more than a quarter-inch when lifted at the midpoint between chainring and rear cog, it’s worn out.
- Does the rear derailleur cage swing loosely side to side? Grab the derailleur body and jiggle it. Loose movement means the hanger bolt needs tightening — or the hanger itself is bent.
- What type of bike is it? Multi-gear derailleur system, or single-speed and fixed-gear? That answer determines your entire fix path.
Once you’ve worked through those, jump to whichever section matches your setup. So, without further ado, let’s dive in.
Fixing a Derailleur Bike Chain That Keeps Falling
This covers road bikes, mountain bikes, and multi-gear commuters running front and rear derailleurs.
- Shift to the smallest chainring and smallest cog. That’s your baseline. Spin the crank slowly by hand — no pedaling under load yet.
- Find the low limit screw on your front derailleur. It’s marked “L,” sitting on the derailleur body facing the frame. Chain falling to the inside during shifts or hard pedaling? This screw. Turn it clockwise a quarter-turn, test, repeat. The chain should step slightly away from the frame each time. Keep going until inside drops stop.
- Check the rear derailleur B-screw. This one controls the gap between the derailleur cage and your largest cog. Chain dropping outside during upshifts? The B-screw is too loose. Tighten it a quarter-turn at a time while shifting to the largest cog — you’re aiming for roughly 5mm between the cage and cog teeth.
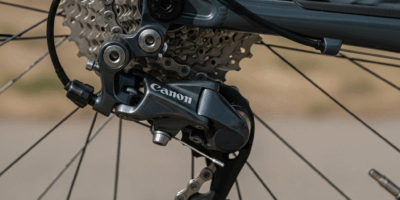
- Inspect the derailleur hanger for bending. This small metal tab bolts to the frame and holds the whole derailleur assembly. Bent even slightly, no amount of screw adjustment fixes anything. Stand behind the bike and look — the derailleur should hang perfectly straight down. Angled at all? You need a derailleur hanger alignment tool or a shop visit. The Park Tool DAG-2.2 runs about $55 if you want to own one.
- Tighten the derailleur mounting bolt. A 5mm Allen wrench on the bolt connecting the derailleur body to the hanger. Snug but not cranked — hand-tight plus a quarter-turn is the target.
- Test through every gear manually. No hard pedaling yet. Smallest to largest cog on the rear, smallest to largest chainring on the front. Smooth tracking, no hesitation, no noise. Chain drops during any shift? Back to step 2 or 3, smaller increments this time.
I’m apparently someone who skips visual checks first — and that habit cost me 20 minutes of pointless tuning once. If the chain dropped only after a crash or hard impact, look at the derailleur hanger before adjusting a single screw. That’s a 30-second inspection that rules out the most common culprit immediately.
Fixing a Single Speed or Commuter Bike Chain Drop
Single-speed bikes, fixed-gear track bikes, and internally geared hub bikes — Shimano Nexus 7-speed, for example — run no derailleurs at all. Chain drop here almost always means tension or alignment. That’s what makes this category so straightforward for most riders who work through it methodically.
- Check rear wheel alignment in the dropout. The chain only runs straight when the wheel sits centered. Loosen the rear axle nuts or quick-release by hand — don’t fully remove them. Grip both chainstays and push the wheel forward gently until it seats completely. Tighten back up. Spin the wheel — it should rotate freely without rubbing the frame or chainstays.
- Measure chain tension. At the midpoint between chainring and rear cog, lift the chain with one finger. Half an inch of movement up is correct. More than that — too loose. Won’t budge at all — too tight. Either condition causes drops. Loosen the rear axle nuts and slide the wheel back to tighten or forward to loosen. Move in 2mm increments — this part genuinely requires patience.
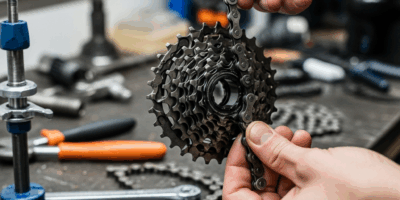
- Inspect the chainring teeth for wear. View them from the side. Healthy teeth have flat tops. Worn teeth look like shark fins — the front face significantly shorter than the back. If that’s what you’re seeing, the chainring is finished. A new single-speed chainring runs $20–$40 depending on tooth count and material. Skipping this replacement is not an option — a worn ring drops the chain regardless of tension.
- Check the rear cog the same way. Less common on single-speeds, but it happens. If both chainring and cog are worn, both need replacing. A new chain on worn cogs skips immediately.
- Verify the chain isn’t stretched. Measure 12 links pin-to-pin with a standard ruler — not including the last pin. New chain: exactly 12 inches. Yours measuring 12.125 inches or more? Stretched. Replace it. Quality single-speed chains run $15–$30 — KMC Z1 and Izumi both work well — and a stretched chain skips teeth and drops constantly.
How to Stop the Chain From Falling Off Again
Prevention is genuinely easier than diagnosis. Check chain wear every month using a chain wear indicator — the Park Tool CC-3.2 costs about $12 and gives you a reading in seconds. Replace at 0.75% wear, before full stretch sets in, and the worn-chainring problem essentially never happens. Early replacement at that threshold can add 20,000 miles or more to a chainring’s usable life.
Keep the drivetrain clean. Dirt embedded in chain links and packed into cog valleys creates friction and accelerates wear faster than almost anything else. A stiff brush and some degreaser — $8 total, roughly — takes five minutes per week. Most mechanical problems start as maintenance problems. That’s what makes regular cleaning so effective.
For trail riders and commuters taking regular beatings, a chain guide is worth considering. Essentially a plastic cage wrapping around the chainring, it physically prevents drops on rough terrain. Expect to spend $25–$50 depending on the model — MRP Bling Ring and Deathmarz both hold up well on gravel and single-track.
Chain drops are normal wear. They’re not a sign your bike is damaged beyond repair. Fix the actual cause, not just the symptom, and your drivetrain runs cleanly for thousands more miles.


Stay in the loop
Get the latest safe cycling zone updates delivered to your inbox.