How to Tell If Your Helmet Fits Wrong
Helmet fit has evolved with all the conflicting advice flying around. As someone who rode for four full years with a poorly fitted helmet, I taught myself the working side of this subject the hard way. Today, I will share it all with you.
Here’s the thing — I had no idea anything was wrong. The helmet sat on my head. The strap buckled. I figured that was enough. It wasn’t.
Two quick self-tests will tell you immediately whether you have a problem.
The Shake Test
Buckle your chin strap. Push on the back of the shell with one hand and rock it side to side. Then front to back. A properly fitted helmet barely moves — maybe a millimeter or two. If it wobbles around your head like a salad bowl, it’s too loose. If it won’t budge at all and you feel it grinding into your temples, too tight. Simple as that.
The Two-Finger Rule
Strap buckled. Slide two fingers — not one, not three — under the chin strap where it sits against your skin. Snug is the goal. One finger means it’s cutting into you. Three fingers means it’s doing essentially nothing. The strap shouldn’t yank your chin upward, and it definitely shouldn’t hang loose.
Most fit problems fall into two camps. Either the helmet digs into your head and causes real discomfort after thirty minutes, or it shifts around constantly while you ride. Both scenarios compromise your crash protection. A helmet that moves on impact won’t absorb force the way it was designed to — and that’s the only job it has.
Helmet Feels Too Tight — What to Check First
Worth saying out loud. Tightness is the easier problem to diagnose, and it usually comes from one of two places: the retention system at the back of your helmet, or the chin strap itself.
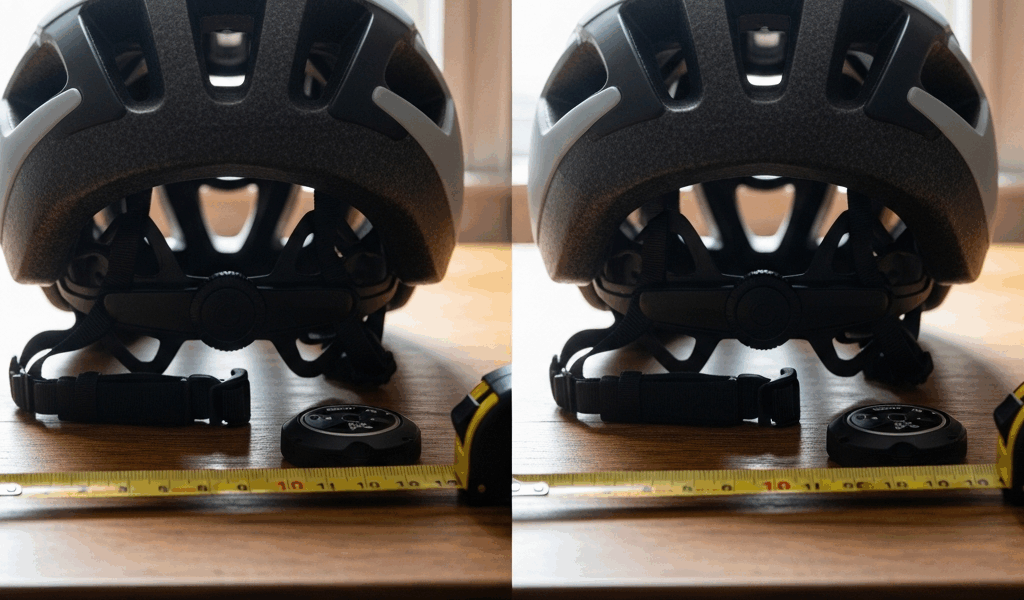
Turn your helmet upside down. Look at the back. You’ll see either a small plastic dial — most common on road and hybrid helmets — or an adjustable ring system typical on mountain and commuter helmets. That mechanism controls how firmly the internal padding hugs your skull.
Try loosening the dial a quarter turn. Just a quarter. Put the helmet back on. The padding should feel like it’s kissing your head, not squeezing it. Even contact across your entire head is what you’re after. If you’ve got a distinct sore spot on your forehead or directly behind your ears, that’s a different issue — a shape mismatch — and we’ll get to that shortly.
Once the retention system feels right, check the chin strap separately. There’s an adjustable Y-splitter near your ears where strap length gets set. Try loosening it one notch. Loosening means letting out more webbing, not cranking the buckle tighter. I’m apparently wired backwards when it comes to this — and Bell’s adjustment system works for me while Giro’s older design never did — so I mention it because I’ve watched dozens of riders do it the wrong way. Skip the misstep I made.
After loosening both the retention dial and the chin strap, run the shake test again. The helmet should feel like a natural extension of your head. Not a vice.
Helmet Feels Too Loose — What to Check First
Looseness is often a retention system problem too — just in reverse. Most riders panic and crank the chin strap tight while the retention dial at the back sits barely snugged. The chin strap alone cannot hold a helmet in place during a crash. The dial does the real work.
Start at the back. Tighten the dial a quarter turn at a time — light finger pressure only. If you’re straining to turn it or need anything resembling a tool, stop immediately. You’ve gone too far. After each quarter turn, run the shake test. When the side-to-side and front-to-back movement disappears, you’re close. Zero movement, zero pressure points — that’s the target.
Then address the chin strap. Tighten it at the Y-splitter near your ears until you’re back to that two-finger measurement. Snug, not restrictive.
Here’s a practical diagnostic that almost no helmet instruction manual actually mentions: tilt your head sharply forward, as if you’re staring straight down at your handlebars. The helmet should stay put. If it tips forward or slides down toward your eyebrows, the retention system isn’t dialed in tightly enough — or your head shape doesn’t match this particular helmet’s design.
If the helmet still tips forward even with the retention dial maxed out, you’re likely dealing with a shape mismatch. Which is exactly where we’re headed next.
When Adjusting Is Not Enough
But what is a shape mismatch? In essence, it’s when your head’s geometry — round, oval, somewhere in between — simply doesn’t match the internal geometry of a given helmet. But it’s much more than that. It means no amount of dial-turning or strap-adjusting will ever make it fit correctly. That’s what makes proper fit so frustrating for some riders.
Signs you need a different helmet entirely — not just different adjustments:
- The retention dial is bottomed out and can’t turn any tighter
- The chin strap is fully extended and still loose
- The helmet sits too high on your head regardless of adjustment, leaving visible gaps above your ears
- Pressure points persist even with the retention system loosened — especially at the temples or the back of the skull
- The helmet rocks when fully tightened, or it’s unbearable to wear for more than fifteen minutes
Head circumference matters, sure. But head shape matters just as much. A Giro helmet might fit your round head perfectly while an ABUS leaves gaps at the sides. Nobody tells you this on the packaging. You find out by trying it on. That was always the rule, and it still is.
Before buying a replacement, grab a soft measuring tape and wrap it around your forehead — just above your eyebrows, around the back of your skull at its widest point. Write down that number in centimeters. Bell, Specialized, Kask — they all publish sizing charts online. Most people land in Small (54–56 cm), Medium (56–59 cm), or Large (59–62 cm), though those ranges shift slightly by brand.
Buy from a shop with a decent return policy if you’re ordering online. Most retailers offer thirty days. Use it if the fit doesn’t work — there’s no award for suffering through a helmet that hurts your head.
Quick Checklist Before Every Ride
Once your helmet fits correctly, keeping it that way takes about five seconds. So, without further ado, let’s dive in:
- Retention dial — snug, zero rocking side to side
- Chin strap — buckled, two fingers under the strap
- Helmet position — level on your head, not tilted back toward your neck or forward toward your eyebrows
- One final shake — nothing moves
That’s it. Thirty seconds before every ride. A properly fitted helmet absorbs impact force the way its engineers intended. A loose or tight one doesn’t — it just looks like it does. Those thirty seconds are the entire difference between a helmet that actually protects you and one that’s essentially decorative.


Stay in the loop
Get the latest safe cycling zone updates delivered to your inbox.