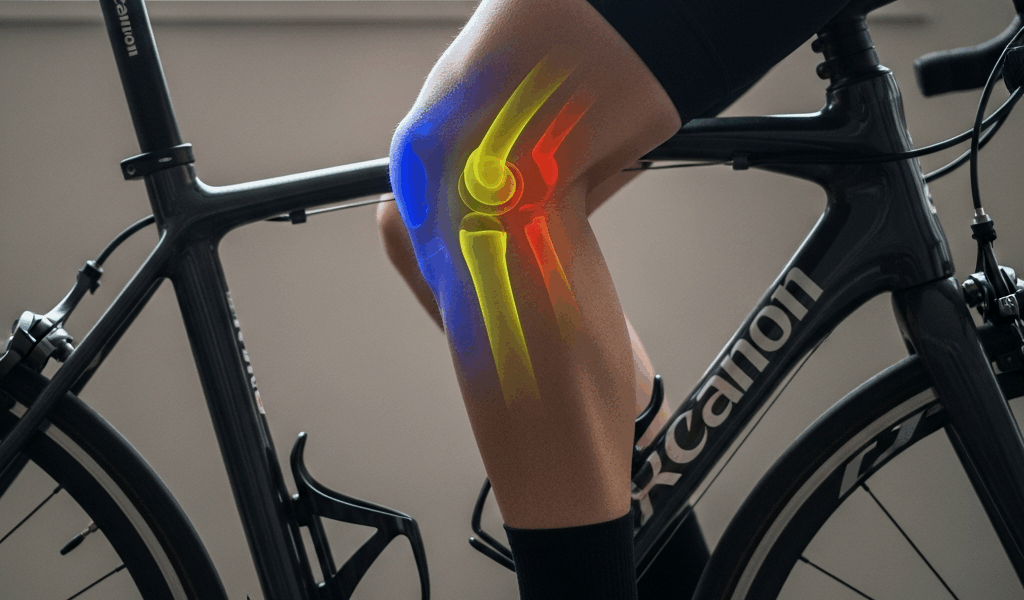
Where Exactly Does It Hurt
Cycling knee pain has turned into a moving target with all the generic advice flying around. Most articles treat every aching knee the same way — and that’s exactly where they go wrong. Your knee doesn’t work that way.
Location is everything. Front knee pain means something entirely different from back knee pain. Outer knee issues need different fixes than inner ones. But what is knee pain location, really? In essence, it’s your body’s diagnostic report. But it’s much more than that — it’s the single most useful piece of information you have before touching a single bolt on your bike.
Think of your knee in four zones:
- Front of knee — directly above or below the kneecap, or around the patellar tendon
- Back of knee — behind the joint, sometimes deep and hard to localize
- Outer side — along the IT band area or lateral knee structures
- Inner side — medial knee, sometimes feels like it’s inside the joint
Your pain location is the map. Everything else follows. Spend two minutes — seriously, just two — identifying which zone hurts most. Don’t be vague. “My knee hurts” tells you nothing. “Right below my kneecap on the left leg” tells you almost everything. Specific pain means specific fixes. That’s what makes this zone system so useful to cyclists who actually want answers.
So, without further ado, let’s dive in.
Front Knee Pain and What It Usually Means
Here’s the part worth saying first. Front knee pain is the most common complaint I hear — and also the most fixable, which is genuinely good news.
Your saddle is probably too low. That’s the answer in roughly 70 percent of cases. Full stop.
A low saddle means your quads absorb almost everything. Your leg never fully extends at the bottom of the stroke. That angle stays too acute, your quads stay under constant load — especially during the drive phase — and eventually the patellar tendon gets angry. The tissues around your kneecap start protesting around mile 12. You know the feeling.
Low cadence makes this dramatically worse. Grinding at 60–65 RPM in a big gear is essentially a resistance workout for your knee joints on every single pedal stroke. I did this for two full seasons before anyone told me otherwise. Steer clear of where I went wrong.
Here’s how to fix it:
- Raise your saddle 2–3mm at a time. Not a full centimeter. Not “a little.” Exactly 2–3mm. Ride 20 minutes. Assess. Adjust again if needed. Most people skip this because the increment feels laughably small. It isn’t. Those millimeters genuinely matter — I noticed a difference at 4mm total and was shocked.
- Use the heel-on-pedal test to find proper saddle height. Sit on your bike near a wall. Place your heel on the pedal at the 6 o’clock position. Your leg should be almost fully straight — roughly 25–30 degrees of bend remaining at the knee. Locked straight means too high. Visible acute angle means too low. Photograph it so you have a reference point.
- Increase your cadence to 80–90 RPM. Stop grinding. Spin easier. Distributing load across the full pedal stroke instead of hammering the downstroke gives your quads actual relief. I went from averaging 65 RPM to 85 RPM over about three weeks. Front knee pain was essentially gone by week two.
- Check cleat position on your shoes. Cleats mounted too far forward shift your foot forward relative to the pedal axle — increasing the lever arm on your knee. Move cleats back slightly if you have significant toe overhang or if the cleat sits at the widest part of the shoe. Ideally, the cleat sits just behind the ball of your foot, closer to the arch side.
One more thing worth mentioning: if you’ve been riding through front knee pain for several months, your movement patterns have probably compensated. Quad dominance is real. Even after correcting the fit, ease back in gradually — don’t jump from 15 miles a week straight to 40. Your tissues need time to rebalance, and that process isn’t fast.
Back and Outer Knee Pain — Different Problem, Same Bike
Back knee pain tells a completely different story than front knee pain.
Here, your saddle is probably too high. A high saddle forces you to reach for the pedals at the bottom of each stroke — your hamstring and calf work harder than they should, and the back of the knee capsule gets compressed and irritated. This type of pain often feels deep. Sometimes almost inside the joint itself, which is unsettling the first time you experience it.
Lower your saddle 2–3mm using the same heel test. If you were chasing a higher saddle position because you felt powerful, back off slightly. Power matters. Knee capsule damage matters more.
Cleat rotation affects back knee pain too. If your heel sits too far inward — rotated inward relative to neutral — your biomechanics shift coming out of the downstroke. Your knee tracks differently through the stroke. Rotate your cleats so your heel sits neutral or just slightly toed-out. Not exaggerated. Just neutral.
Outer knee pain is usually IT band tension or lateral knee irritation. Three common causes I keep seeing:
- Cleat rotation is wrong. Toed-in cleats push your knee tracking inward on every downstroke. The IT band gets cranky fast — and stays cranky. Cleats should sit neutral to slightly toed-out. If you’re riding Shimano SPD-SL pedals, you likely already have 6 degrees of float built in. Use it. Avoid any extreme toed-in setup.
- Saddle is too high — again. High saddle combined with toed-in cleats creates a biomechanical mess where the knee drifts inward repeatedly. Outer structures get stretched and irritated over dozens of miles. Check saddle height first before touching anything else.
- Cleat float tension cranked too tight. I’m apparently someone who rode with maximum tension for years, and Look Keo cleats work fine for me now with float backed off while Shimano’s tightest setting never agreed with my left knee. If your foot has zero rotational movement on the pedal, your knee absorbs all the micro-corrections that would otherwise happen naturally. Back the tension off. Let your foot rotate maybe 2–3 millimeters. Your knee handles the rest.
Outer knee pain takes longer to resolve than front knee pain. Once the IT band gets genuinely irritated, it stays that way for weeks — even after the root cause is fixed. Make one change. Wait 10–14 days before evaluating. That patience is genuinely hard, but rushing assessments just creates confusion about what’s actually working.
Quick Bike Fit Checks You Can Do Without a Fitter
While you won’t need a full $300 professional fit to resolve most knee pain, you will need a handful of tools — a 4mm and 5mm hex key, a tape measure, and honest eyes on your current setup. First, you should photograph your current position before touching anything — at least if you want a baseline to return to if adjustments go sideways.
Check one: saddle height heel test. Already mentioned it. Mentioning it again because it’s that important. Heel on the pedal at 6 o’clock, slight knee bend. Write down the measurement from the center of your bottom bracket to the top of your saddle. Mine is 74.5cm on my Trek Domane. Knowing your number matters when you’re making 3mm adjustments in a parking lot.
Check two: saddle fore-aft position. Sit on the bike, put the ball of your foot on the pedal with the crank arm at 3 o’clock — horizontal, level with the ground. Drop an imaginary vertical line from your kneecap. That line should pass through or just slightly behind the pedal spindle. Knee way forward of the spindle means saddle too far forward — slide it back 5–10mm. Knee way behind means slide it forward. Small changes here shift load distribution significantly.
Check three: handlebar reach. Bent elbows, upper arms close to vertical. If you’re stretching aggressively to reach the bars, you’re compressing your lower back — and a compressed lower back shifts your hip angle, which then changes how your knee tracks through the stroke. Most stems come in 80mm, 90mm, 100mm, and 110mm lengths. A single 10mm swap can reshape your entire position. That’s a $25–40 fix, not a $300 one.
Check four: pedal alignment while standing. Weight on the pedals, feet pointing straight ahead. Pigeon-toed? Rotate cleats outward. Splayed outward? Rotate inward. Neutral foot equals neutral knee tracking. This sounds almost too simple — it’s genuinely not.
These four checks address roughly 80 percent of cycling knee pain cases. Most riders never adjust anything after buying the bike. They just ride whatever came stock. Stock setups are built for statistical averages, and almost nobody is actually average.
When to Actually Stop Riding and Get Help
After two weeks of raising your saddle, adjusting your cleats, spinning a higher cadence, and checking fore-aft position — most knee pain improves noticeably. Some doesn’t.
If the pain persists past two weeks of proper adjustments, if there’s visible swelling around the joint, if the sensation is sharp rather than dull, or if things are getting worse instead of better — that’s when you book a sports physio or orthopedist. Not before doing the work yourself. But definitely after. Sharp pain and swelling aren’t fit problems.
A good sports physio might be the best option at that stage, as persistent knee pain requires both clinical assessment and personalized biomechanical guidance. That is because your specific movement patterns — hip drop, foot supination, leg length discrepancy — can’t be diagnosed through a general article. They’re worth every dollar once you’ve ruled out fit as the cause. Most bike shop “free fit checks” miss the nuance that actually matters, so doing this groundwork yourself first saves both time and money.
Bottom line: cycling knee pain while pedaling is usually a fit problem, not a structural one. Your bike is telling you something specific. The zone where it hurts points directly at the cause. Adjust one thing at a time. Give changes 10–14 days. Most pain, approached methodically, goes away entirely.


Stay in the loop
Get the latest safe cycling zone updates delivered to your inbox.