How to Tell if Your Tire Pressure Is Off Without a Gauge
Tire pressure has turned into a moving target with all the conflicting advice flying around. Pump it hard. Don’t pump it too hard. Use a gauge. Don’t bother with a gauge. As someone who has flatted on a water grate at 40 PSI when my tire needed 60, I put in the hours studying diagnosing pressure by touch and sight alone. Today, I will share it all with you.
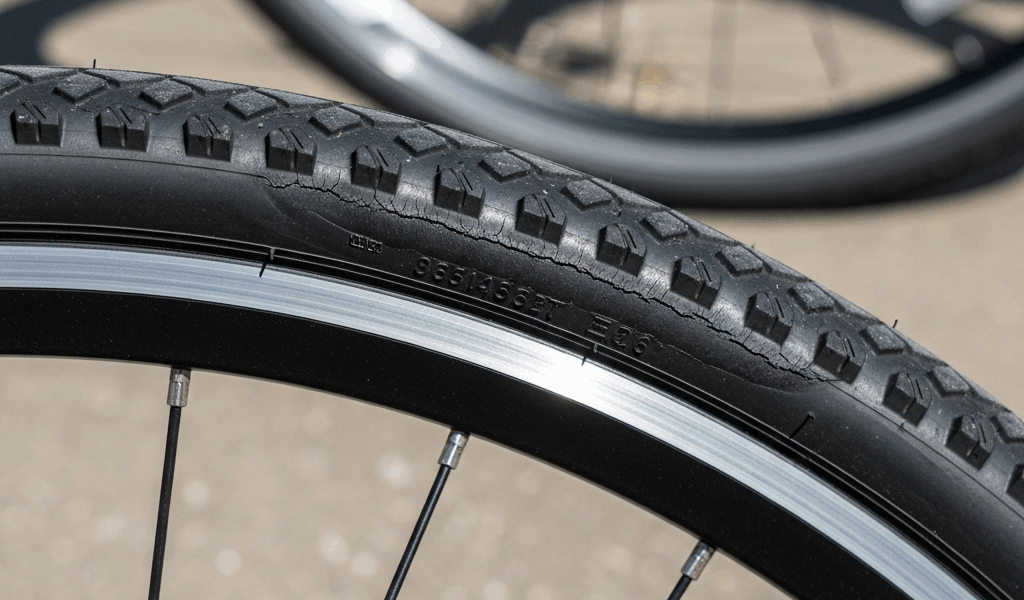
Start with the squeeze test. Pinch the sidewall between your thumb and forefinger — not a white-knuckle grip, just firm and deliberate. A road tire sitting in the 80–110 PSI range should feel almost like squeezing a brick. Barely any give. An underinflated tire surrenders under your fingers, soft like a half-full water balloon. An overinflated tire? Hard everywhere, including right at the contact patch.
But what is the squeeze test really telling you? In essence, it’s measuring how much air volume is resisting your fingers. But it’s much more than that. Tire width completely changes the feel. A 28c road tire at 100 PSI feels nothing like a 2.0-inch hybrid tire at 60 PSI — even though both are sitting exactly where they should be. The wider tire spreads pressure over more rubber. If you ride road bikes and then grab a hybrid, correct pressure will feel suspiciously mushy. Don’t let that trick you into over-inflating.
The sag test comes next. Sit on the saddle with your full weight — no bouncing, just settle in. Look down at the contact patch. You should see a flat spot roughly thumb-width across. More squash than that? You’re low. Almost no visible deformation at all? You’ve gone too far in the other direction. That’s what makes this test genuinely useful to cyclists of any size — it accounts for your body weight automatically, something a gauge reading sitting on a workbench simply cannot do.
Quick note before the rest of this: sidewall bulge is your emergency indicator. If the tire is visibly ballooning outward — like the rubber is trying to escape the rim — stop riding immediately. That’s dangerously low pressure and a rim strike waiting to happen. On the opposite end, a tire that looks pinched or shrunken tight against the rim edge is also a problem. Neither situation is safe for the next quarter mile. So, without further ado, let’s dive into what overinflation and underinflation actually feel like when you’re moving.
Signs Your Tires Are Overinflated
Overinflated tires feel deceptively fast at first. Almost no rolling resistance. The ride turns harsh and buzzy — small cracks in pavement send vibration straight into your palms and sit bones because the tire can’t deform enough to absorb anything. I’m apparently sensitive to this and my Lezyne Steel Floor Drive gauge keeps me honest while riding by feel never works for me in the overinflation direction.
Many riders pump past the recommended range believing firmer always means faster. Rolling resistance does drop slightly with higher pressure. But the contact patch shrinks, grip disappears in corners, and the rear wheel starts skipping and chattering on rough pavement instead of conforming to it. On a hybrid commuter inflated to 80 PSI when the sidewall says 65 PSI max, you’ll feel it as nervous twitchiness in the steering — a jumpy, unsettled sensation when turning at speed.
The mechanical problem: an overinflated tire is essentially rigid. It bounces over obstacles rather than deforming around them. Over months of rough road riding, that constant micro-bouncing fatigues the tire bead and quietly damages the rim.
Overinflation also increases pinch flat risk during hard impacts. Yes, really — this surprises almost everyone. A tire at 120 PSI hits a pothole and transfers all that force directly to the rim. The tube pinches between the bead and rim edge. Two punctures in a line. Classic snake-bite. A properly inflated tire deforms around that same pothole and absorbs the hit instead.
Check your sidewall for maximum PSI. That number is a hard limit — not a target, not a recommendation. Many riders inflate straight to the max thinking more air means a tougher tire. It means risk. Don’t repeat what I did.
Signs Your Tires Are Underinflated
Underinflation is far more common, especially among commuters. The symptoms are slow and sneaky. The bike rolls sluggish. Steering goes vague — corners require more input and the bike responds late. It doesn’t feel alarming enough to stop and investigate. So riders accept it as normal. Until they flatten.
Look for tire squirm in corners. Watch the sidewall from the side while you’re turning — a 2.0-inch commuter tire at 35 PSI when it should be at 55 PSI will visibly bulge sideways at the shoulder. That instability travels straight into your hands, even at parking lot speeds.
Frustrated by a second flat in one week on my daily commuter, I finally checked my pressure and found 38 PSI where 60 PSI belonged — using nothing but a $6 Presta-compatible dial gauge I’d tossed in my bag and forgotten about. The snake-bite pattern on my tube told the whole story. Two parallel holes. Pinch flat from a water grate. This new habit of weekly pressure checks took off from that point and eventually evolved into the touch-feel diagnostic routine cyclists know and rely on today.
At very low pressure — below 20 PSI on any bike — the tire can roll off the rim during hard cornering. Complete detachment. Total loss of control. That’s not a flat. That’s a crash.
Underinflation usually happens gradually through slow leaks. Fine yesterday, noticeably soft today. Check the valve stem first — tighten it counterclockwise if it’s loose. Then inspect for punctures, sidewall damage, or deteriorated rim tape. While you won’t need a full repair kit for a quick diagnosis, you will need a handful of basics: a gauge, a mini-pump, and two minutes of attention before every ride.
Correct PSI Ranges by Bike and Rider Weight
Use this as your baseline. Always check your tire sidewall for maximum rated pressure — that’s your hard upper limit, never your inflation target.
- Road bikes (23–32c tires): 80–110 PSI
- Hybrid and commuter bikes (35–50c tires): 50–70 PSI
- Gravel bikes (40–50mm tires): 35–55 PSI
- Mountain bikes (1.9–2.5 inch tires): 25–35 PSI
Rider weight shifts these ranges more than most guides admit. A 130-pound rider and a 220-pound rider on identical bikes need meaningfully different pressures. The heavier rider needs more air to prevent bottoming out on impacts and keep the sidewall stable under load. A general starting point: below 160 pounds, start at the lower end of your range. Between 160–200 pounds, aim mid-range. Above 200 pounds, work toward the higher end. Then fine-tune based on how the bike feels over your actual roads.
Your tire sidewall is the source of truth — max PSI, width, load rating, all of it is printed right there. That’s your authority on this. Not this article. Not any website.
How Often You Should Check and What to Use
Road bikes need a pressure check before every single ride. Thin tires, high pressure, fast air loss. Commuters should check weekly — at minimum. Mountain bikes and gravel bikes once a week during active season is sufficient, though checking before a longer trail ride never hurts.
A floor pump with an integrated gauge might be the best option, as regular inflation requires consistent accurate readings. That is because CO2 cartridges are fast in an emergency but imprecise — and you’ll run out mid-repair if you’re not careful. The Lezyne Steel Floor Drive runs around $60, lasts years, and gives you reliable pressure feedback every time. First, you should grab one of those — at least if you ride more than twice a week.
Presta and Schrader valves require different pump heads. Check compatibility before you buy anything. Mixing them up mid-repair on a cold morning is a specific kind of frustration you don’t need.
Build the habit: check pressure while the bike is still in the stand, before you put your kit on. That five-second squeeze test and quick visual scan become automatic after a few weeks. You’ll catch slow leaks before they strand you, and you’ll develop the touch-feel diagnostic skill that keeps you rolling instead of crouching over a tire on the side of the road wondering what went wrong.


Stay in the loop
Get the latest safe cycling zone updates delivered to your inbox.