Why Helmet Fit Actually Matters for Safety
Helmet fit has evolved with all the vague, contradictory advice flying around. “Snug but comfortable.” Great. Thanks for nothing. I bought a new commuter helmet last spring — a Giro Register, around $65 — and wore it for three weeks before realizing it was sitting nearly an inch too far back on my head. Something felt off the whole time. The helmet shifted when I turned corners. The padding felt uneven on one side. I kept second-guessing whether it was actually doing anything useful up there.
Turns out I wasn’t being paranoid. Studies consistently show that roughly 70% of riders wear helmets that don’t fit correctly. A poorly fitted helmet slips during impact. It fails to cover the parts of your head that most need covering. That was a sobering number to read after three weeks of riding around with a misconfigured helmet on my head. Side-step the error I made.
Today, I’ll share everything I know about testing helmet fit at home — a tactile, five-minute self-test that tells you exactly whether your helmet is too tight, too loose, or sitting wrong on your head. So, without further ado, let’s dive in.
The Two-Finger Eye Test and What It Tells You
Start here. Put your helmet on the way you normally wear it — no adjustments yet, just how it naturally lands. Hold up two fingers horizontally and slide them into the gap between your eyebrows and the helmet’s front edge. Exactly two fingers should fit. Not one. Not three. Two.
But what is this test actually measuring? In essence, it’s checking whether your helmet’s protective padding is centered over the right parts of your skull. But it’s much more than that. That two-finger gap tells you whether your forehead — one of the first points of contact in a crash — is actually inside the helmet’s coverage zone or sitting exposed below the shell.
If the front edge sits too high, the helmet has drifted back. Your forehead hits the pavement first. The padding is covering your mid-scalp instead. I’ve seen riders with helmets so far back you could see their entire forehead sitting completely below the shell — and they had no idea. On the other side, if the helmet sits so low you can barely squeeze one finger in that gap, the front rim digs into your forehead and the back of the shell lifts away from your lower skull. That’s unprotected space right where you don’t want it.
If you can’t hit that two-finger position no matter how you shift the helmet forward or backward, write that down. It likely means a sizing issue — which we’ll get to.
How to Test If Your Helmet Is Too Tight or Too Loose
The Shake Test
Fasten your chin strap. Grab both sides of the helmet at ear level and shake it gently side to side. Your head and the helmet should move together — one unit, no independent sliding. The helmet can shift slightly, but it shouldn’t rock across your scalp like it’s floating there.
Pass: The helmet stays put. Head and shell move as one.
Fail — Too Loose: The helmet rocks back and forth while your head barely moves with it. Usually means the shell is too large, or the retention dial at the back hasn’t been tightened enough.
Fail — Too Tight: The helmet clamps down and won’t budge even with deliberate pressure. You feel it squeezing at specific points — temples, forehead, the back curve of your skull. That’s a pad thickness problem or an over-tightened retention system.
The Push-Up Test
Place your palm against the back base of the shell and push upward. A well-fitted helmet resists. The chin strap tightens against your jaw as the shell tries to rise, but the helmet itself shouldn’t travel more than half an inch upward.
Pass: Immediate resistance. The shell barely moves. You feel the chin strap engage right away.
Fail — Too Loose: The helmet slides up an inch or more. Your chin strap is probably too slack, or the shell is genuinely oversized. In a crash, this means the helmet rotates forward — the back of your skull ends up exposed exactly when you need it covered.
Fail — Too Tight: No movement at all, but there’s a sharp pinching sensation at the back where the shell or pads dig in. That’s uneven pad pressure — or a shell that’s just too small for your head shape.
The Chin Strap Pinch Test
Buckle your chin strap normally. Slide one finger under the strap at your chin. One finger. That’s the standard. Fits comfortably — you pass. Can’t fit any finger at all — too tight. Fits two fingers with room to spare — too loose.
Pass: One finger slides in snugly. The strap isn’t cutting into your skin, but it’s not dangling either.
Fail — Too Loose: The strap has real slack in it. During a crash, the helmet rotates or slides off entirely. A lot of riders loosen their chin straps for comfort on long rides and genuinely don’t realize they’ve turned their helmet into a decorative hat.
Fail — Too Tight: The strap presses hard against your jaw. You feel it after five minutes. It doesn’t improve your protection — it just creates pain and neck fatigue over longer rides.
Fixing a Bad Fit Without Buying a New Helmet
Most helmets ship with extra padding for a reason. Heads aren’t uniform — not in size, not in shape — and manufacturers know it.
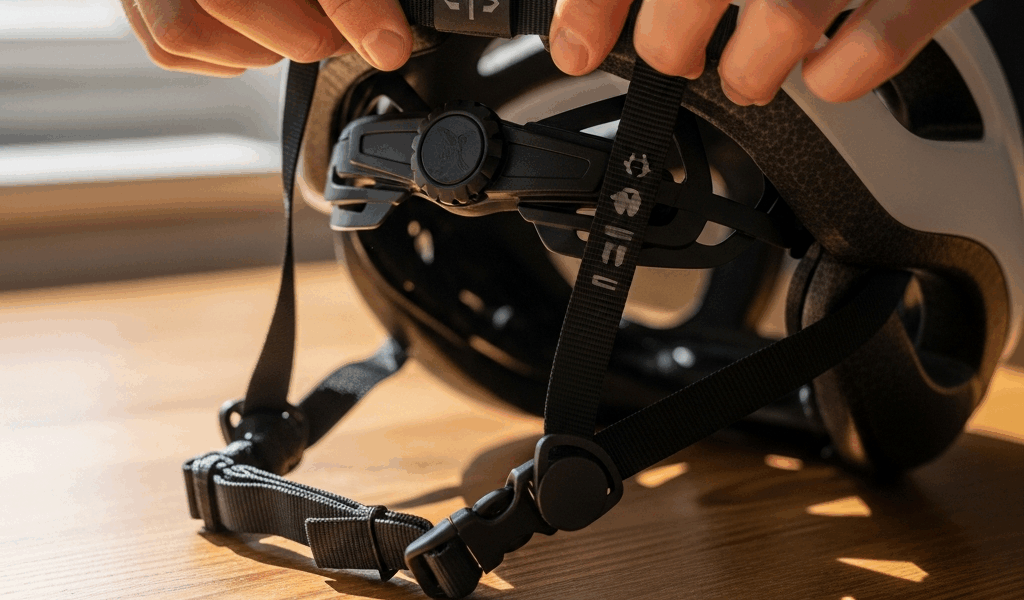
If your helmet is too loose: Start with the retention system — the ratchet dial at the back. Twist it clockwise until the helmet stops rocking during the shake test. Still loose? Pull the existing foam pads and swap them for thicker ones. Most helmets include spares in the box. You can also add thin adhesive-backed foam strips along the sides if thickness is the issue. A pack of universal helmet pads runs about $8–$12 on most cycling sites.
If your helmet is too tight: Back off the retention dial first — a quarter-turn often makes a surprisingly big difference. If pressure points persist at specific spots, swap the thicker pads for thinner ones. Some riders lightly sand down foam pads, though swapping is cleaner and easier. Drop the chin strap one notch too. Target: one finger, not zero.
If the helmet keeps shifting forward or backward: The retention system may be sitting unevenly. Check that the ratchet dial is level across both sides. Some helmets have side adjustment sliders on the chin strap — small plastic pieces that let you move the anchor point forward or backward. Moving a slider back an inch sometimes eliminates forward creep entirely. Worth experimenting with before giving up on a helmet.
When the Helmet Is Just the Wrong Size for Your Head
This is the piece to know up front — it’s the hardest part to hear after you’ve already paid for the helmet and ridden it for two weeks.
If the shell has a pronounced gap around your entire head, or if it pinches at one specific point regardless of every adjustment you try, the shell shape is wrong for your head shape. Not all skulls are round. Some are longer front-to-back. Some are narrower at the temples. I’m apparently a “long oval” head shape — a Bell Stratus fits me well while a Giro Syntax never quite works, even in the same listed size.
Here’s how to measure correctly. Use a soft fabric measuring tape — the kind tailors use, not a metal ruler. Wrap it around the widest part of your head, roughly an inch above your eyebrows and ears. Measure in centimeters for accuracy. Around 55–57 cm typically lands in medium. 52–54 cm is small. 58–60 cm is large. Always check the manufacturer’s sizing chart for your specific model — Bell, Giro, Bontrager, POC, and Lazer all cut their shells differently.
That’s what makes helmet fitting endearing to us cyclists — it’s weirdly personal, almost like buying shoes. Do the self-tests first. Run through the adjustments. Then, and only then, consider exchanging the helmet or trying a different brand. By that point you’ll know exactly what you need in the next one — and you won’t spend three weeks riding around with your forehead hanging out below the shell.


Stay in the loop
Get the latest safe cycling zone updates delivered to your inbox.